Autograding Gameboy Advance DMA Transfers
December 8, 2018In CS 2110 at Georgia Tech, we use the Gameboy Advance to demonstrate how C code can interact directly with hardware. On a high level, students create games by reading button states directly from memory-mapped registers and write directly to a special region of memory called the “video buffer,” which the video controller continuously reads and draws on the screen.
But my favorite example of students poking with the GBA hardware
introduces them to an important real-life example: Direct Memory Access
(DMA)! The GBA has a DMA controller which amounts to a fast memcpy()
in hardware with some additional switches to flip. (See tonc for more
details on GBA DMA.)
Students use DMA as follows:
// provided boilerplate
typedef struct {
	const volatile void *src;
	volatile void *dst;
	volatile uint32_t cnt;
} DMA_CONTROLLER;

#define DMA ((volatile DMA_CONTROLLER *) 0x040000B0)

#define DMA_DST_INC (0 << 21)
#define DMA_DST_DEC (1 << 21)
#define DMA_DST_FIX (2 << 21)

#define DMA_SRC_INC (0 << 23)
#define DMA_SRC_DEC (1 << 23)
#define DMA_SRC_FIX (2 << 23)

#define DMA_ON (1 << 31)

// STUDENT CODE:
// Turns the whole screen red
void redscreen(void) {
    volatile u16 color = RED;
    DMA[3].src = &color;
    DMA[3].dst = videoBuffer;
    // dimensions of gba screen
    DMA[3].cnt = DMA_ON | DMA_SRC_FIX | DMA_DST_INC | (240 * 160);
}
Notice that the student code above which invokes DMA does not call a
function we can mock out in an autograder, like how a student’s
malloc() could call a fake sbrk() — it’s just hitting memory at
some weird address.
You might think: well this is easy you dingus, just make the
DMA macro point to some chunk of memory which you can check after
their code returns! However, GBA DMA normally stops the CPU
while it makes the copy, and that would not. Let’s
look at a less trivial example of DMA:
void redsquare(int width, int height) {
    volatile u16 color = RED;
    for (int row = 0; row < height; row++) {
        DMA[3].src = &color;
        DMA[3].dst = videoBuffer + row * 240;
        // dimensions of gba screen
        DMA[3].cnt = DMA_ON | DMA_SRC_FIX | DMA_DST_INC | width;
    }
}
If we used the “magic DMA buffer” idea mentioned above, later DMA transfers would clobber src/dst/cnt values from earlier transfers. That is, we would only see the DMA results for the last row of the red square. So that ain’t gonna work.
Consequently, before this semester, we never autograded DMA. Instead, we
would grep students’ code for for loops to see if they were
manipulating the videoBuffer pixel-by-pixel1 without DMA and then
would make sure the emulator showed the right image. But my goal in 2110
is to autograde as much as possible, especially because TAs would’ve
needed to grade this timed lab during or right before their final exams,
so I decided to try to adapt my favorite homework from my Operating
Systems class into an autograder.
Abusing Virtual Memory to Solve Your Life Problems
What’s a good way to make a memory access halt execution of a program,
much like how setting the DMA_ON bit in the control register makes the
DMA controller halt the CPU while the copy runs? A page fault!
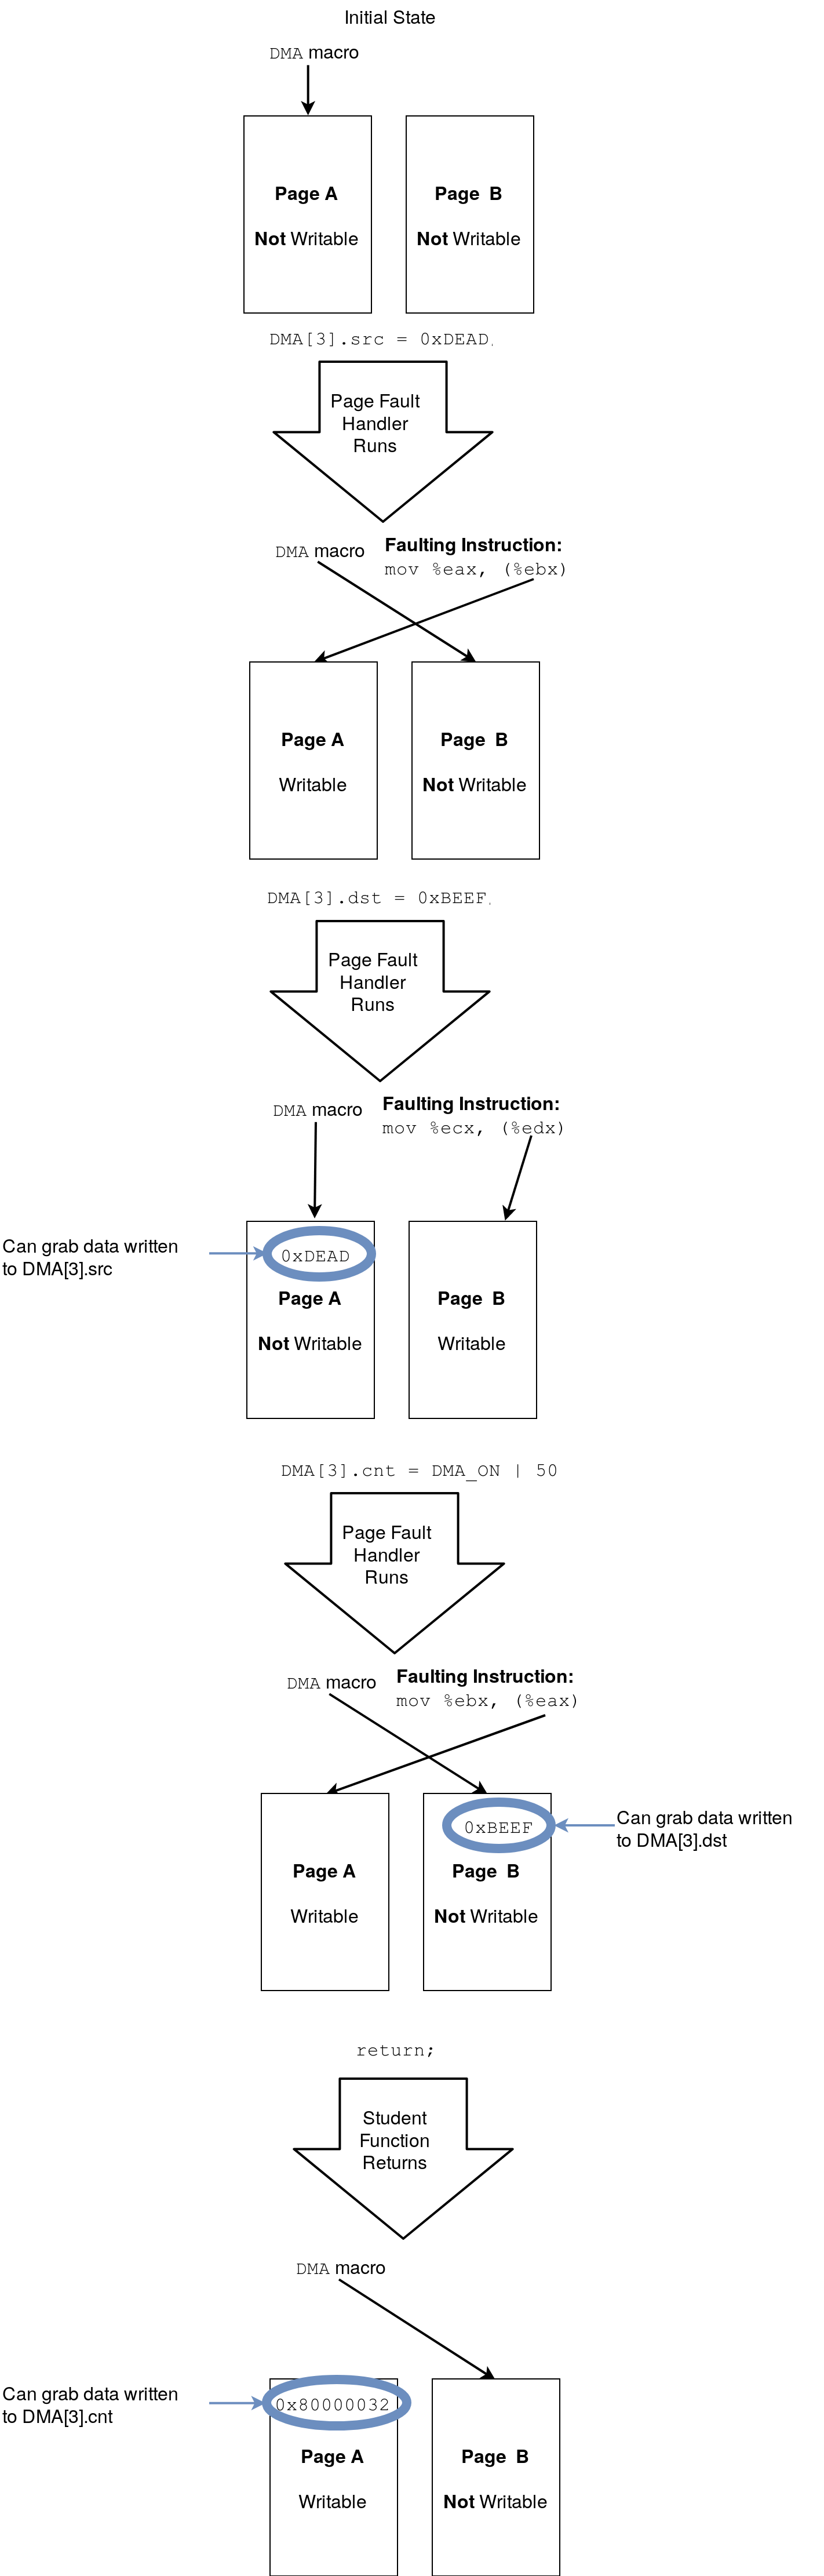
We can make DMA accesses pagefault by making the DMA macro point to some page marked as unwritable in the page table. Then our page fault handler runs and can read what they wrote! Except it’s not that simple: when an instruction pagefaults, it doesn’t actually run, so we can’t see what students wrote to our fake DMA page. In other words, we can see what address the student tried to hit, but not what they wrote (yet). So instead, our page fault handler needs to mark the fake DMA page as writable in the page table, so that when the hardware re-tries the faulting instruction, it actually has an effect.
But this re-introduces the original problem: how do we know what they wrote? Indeed, if our page fault handler makes the fake DMA page subsequently writable, then later DMA accesses won’t pagefault, meaning we’ll miss them and they’ll clobber the written data in the fake DMA page. We’re back to square one!
My solution was to use two fake DMA pages and alternate between them. The DMA macro always points to an unwritable page, but when an instruction faults, we change the page it’s trying to hit to writable. (Changing the page to which the DMA macro points will not change the page that the faulting instruction hits when the hardware retries the instruction because the old page will still be in some register, unchanged.) This solves our problem because every DMA access will pagefault, and we can see the data that the user wrote on DMA access $t$ when DMA access $t+1$ pagefaults.
So the pseudocode for the tester would look like:
page fault handler:
    make sure this is a fake DMA-related page fault
    read what the student wrote to the fake DMA page on
        the last faulting access. log it
    mark the page to which the DMA macro points as
        writable so the faulting instruction can run
    set the DMA macro to point to the alternate page and
        set it as unwritable

tester code:
    set up page fault handler
    run student code
    check fake DMA page for data written by student on
        the final access
    exit
A visualization for all this follows:
On Linux, you can map pages with mmap(), change their permissions with
mprotect(), and catch page faults by registering a SIGSEGV handler.
And to make sure the compiler loads the address of the fake DMA page
from memory every time we dereference the DMA macro, we can define the
DMA macro such that it expands to a volatile *volatile. That is, a
pointer to volatile memory that itself is volatile, like
#define DMA ((volatile DMA_CONTROLLER *volatile) fake_dma_page)
Simulating DMA
Simulating DMA seems simple enough. When the the segfault handler or
cleanup code reads what the student wrote to the fake DMA page, we see
if they set the DMA_ON bit in the control register, and if they did,
simulate it!
But there’s a complication here too. Returning to the earlier example,
void redscreen(void) {
    volatile u16 color = RED;
    DMA[3].src = &color;
    DMA[3].dst = videoBuffer;
    DMA[3].cnt = DMA_ON | DMA_SRC_FIX | 38400;
}
we see the student (correctly) sets the source register to the address
of a variable on the stack. But we can only check to see that they set
DMA_ON in the control register after their function returns because
there are no later fake DMA segfaults — this is true for the last DMA
access in general. But accessing memory in the stack frame of a function
which has returned is undefined behavior in C, because it’s gonna get
clobbered by subsequent function calls! Yikes!
Speculative Copying, aka Copy Like a Madman
The instant the user sets the DMA_ON bit in the control register, we
need to take a snapshot of memory around where the source register
points. However, we have a few problems with when this copy needs to
happen:
- We only know they’re writing to the control register, not that
they’re setting the
DMA_ONbit - Similarly, we don’t know how much they’re copying
- We don’t know if they’re using source decrement or source increment.
(Source decrement means subtracting 2, or 4 if 32-bit DMAing is
enabled, from the source address instead of adding after
each one of the
Ntransfers.)
We can fix all three of these issues by simply copying super aggressively when the user sets the control register, even if we don’t know what flags they set or size they requested. In particular, if they copy more than 38,400 pixels (shorts), they’re doing the problem wrong anyway (since that’s bigger than the actual videoBuffer!), so that provides an upper bound. And to handle source decrement, we can copy the 76,800 bytes on the left-hand and right-hand side of the source pointer, just in case.
But now we have a new problem: what if, for example, they’re using
source decrement and they set the source pointer near the end of the
heap? Then we’re gonna segfault when trying to “snapshot” memory. The
hack I found is to fork() and then copy until failure. Pseudocode:
zero out source buffer

fork()
    copy left-hand side of src pointer byte-by-byte
        until I segfault, stopping at the max copy size

fork()
    copy right-hand side of src pointer byte-by-byte
        until I segfault, stopping at the max copy size

wait()
wait()
So if they copy too far, instead of a segfault in the mystery tester, they’ll get black pixels (note the zeroing out of the source buffer at the top).
This approach seems like it would be slow because of the sheer amount of copying, but it actually seems to perform pretty well. 🤷
The Autograding Part
Now that we’ve got GBA DMA to work on x86, we still have to autograde it. How? Let’s make up an assignment in which the student simply draws an image in the top left of the GBA screen. That is, they have to complete:
void drawImage3(const u16 *image, int width, int height) {
    // Student writes this code
    for (int r = 0; r < height; r++) {
        DMA[3].src = image + width * r;
        DMA[3].dst = videoBuffer + 240 * r;
        DMA[3].cnt = DMA_ON | width;
    }
}
What exactly is “right” here? Is this
void drawImage3(const u16 *image, int width, int height) {
    for (int r = 0; r < height; r++)
        for (int c = 0; c < width; c++)
            videoBuffer[240 * r + c] = image[width * r + c];
}
“right”? Probably not if the assignment is about DMA, but it deserves some partial credit if it works. How about this
void drawImage3(const u16 *image, int width, int height) {
    for (int r = 0; r < height; r++) {
        for (int c = 0; c < width; c++) {
            DMA[3].src = image + width * r + c;
            DMA[3].dst = videoBuffer + 240 * r + c;
            DMA[3].cnt = DMA_ON | 1;
        }
    }
}
or this
void drawImage3(const u16 *image, int width, int height) {
    for (int r = height - 1; r >= 0; r++) {
        DMA[3].src = image + width * r + width - 1;
        DMA[3].dst = videoBuffer + 240 * r + width - 1;
        DMA[3].cnt = DMA_ON | DMA_SRC_DEC | DMA_DST_DEC | width;
    }
}
strange example? I settled on the following:
- Require they use DMA to draw pixels on the screen
- Require they use the minimum number of DMA calls possible without violating #1
- For each test input, have two separate tests:
- One simulates DMA and tests that the videoBuffer is correct. This awards credit for not using DMA or misusing it (e.g. the single-pixel DMA example above) but still getting it working
- The other compares the log of DMA calls with the expected, but does its best to allow perfectly valid cases like the double-decrementing one right above even though it does everything backwards from the simpler approach
Regions of the Screen
For the second test above, I ended up taking the log of their DMA calls and converting each call to a generalized form of some ordered quadruplet $(i_\text{start}, i_\text{end}, v_\text{start}, v_\text{end}) \in \mathbb{Z}^4$, where the first two coordinates are the start/end indices in the image of the copy, and the next two are the same except for the videoBuffer.
Then I normalized each copy in both the actual and expected lists of copies using the following two steps: First, if $i_\text{start} > i_\text{end}$ for any transfer $(i_\text{start}, i_\text{end}, v_\text{start}, v_\text{end})$, then I converted the quadruplet to $(i_\text{end}, i_\text{start}, v_\text{end}, v_\text{start})$ since that represents the same copy. Then I sorted the list of copies by start index.
After normalizing both the actual and expected copies, I can compare them copy-by-copy in order and display a (hopefully) helpful error message to the student on the first one that does not match.
Example Tester
If you’re interested, the GitHub repository for all this DMA stuff has a complete example of a tester which uses the strategies I rambled about above. Beware, the student half, which runs a GBA emulator, requires the CS 2110 GBA toolchain, but that’s not really the fun part — the grader is!
-
One student infamously evaded our
grepchecking by unrolling their loop by hand. That’s hundreds of lines and we loved it ↩︎